

What is lenticular printing
A powerful printing technology that uses lenticular plastic to create visually striking images with the illusion of motion and 3D
What lenticular effects can be achieved
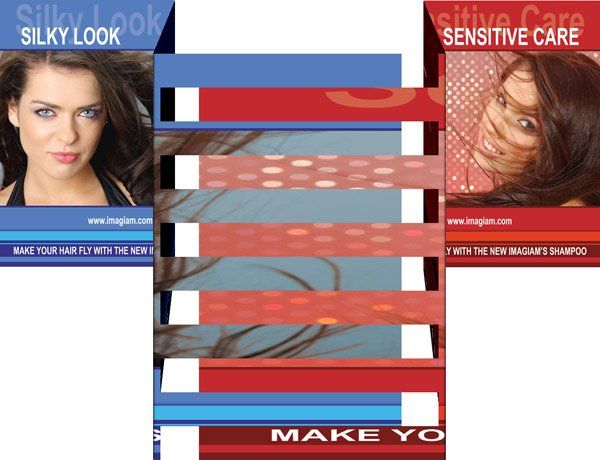
Flip and animation
The lenticular flip effect combines two or more very different images that change from one to the other as the angle of observation of the print changes. The animation effect, meanwhile, is composed of various images with slight differences but that together form a small video sequence. The zoom and morphing effects become variations of this same concept.
3D lenticular effects
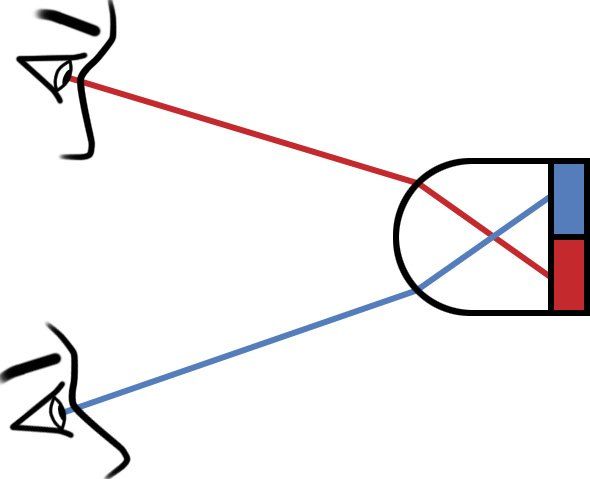
In the 3D effects, the lenticular plastic allows each eye to see a slightly different representation of the same scene. The brain integrates both images and thus creates a three-dimensional illusion in the observer without the need for stereoscopic glasses. The flip, animation and 3D lenticular effects can be mixed all together in order to maximize the visual impact of the prints.
How lenticular works
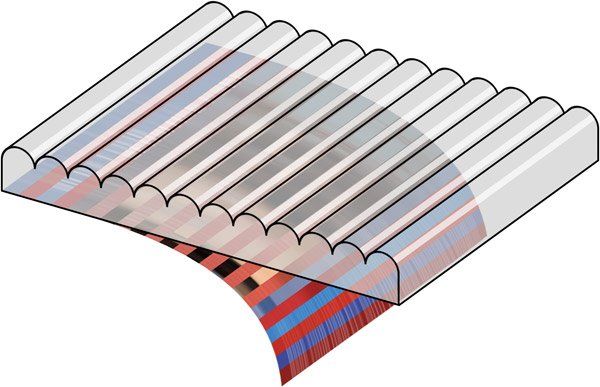
Lenticular printing relies on two key components: a lenticular plastic sheet (often called a lens array) and an interlaced image that has been carefully processed. The lens array consists of parallel cylindrical lenses that focus on narrow strips of the underlying image. When viewed from different angles, each lens reveals a different slice of the image, creating effects such as flip, animation, or 3D depth.
Step 1: Interlacing the images
In the first step, the various source images (frames for animation or different viewpoints for 3D) are each divided into narrow vertical strips. These strips are then combined into a single, interlaced image file.
- For a flip effect, lenticular software alternates strips from two or more distinct images.
- For animation, consecutive frames are sliced and stitched in a sequence.
- For 3D, multiple perspectives of a scene—or artificially generated depth maps—are interlaced together.
Professional solutions like Imagiam’s lenticular software automate this interlacing process with precise control over strip width, alignment, and color management to ensure crisp, high-quality results.
Step 2: Printing and lamination
Once the image is interlaced, it must be paired with the lenticular sheet. This can be done in two ways:
- Direct printing: Print directly onto the back (flat side) of the lenticular plastic using UV-curable inks.
- Laminate: Print the interlaced image on paper or film, then laminate it behind the lenticular sheet with a transparent adhesive.
Either way, accurate registration is crucial so that each lens aligns perfectly over its corresponding strip. Proper calibration ensures the finished lenticular print produces the desired effect without blur or misalignment.
Step 3: Viewing through the lens
After printing or lamination, the cylindrical lenses isolate and magnify the strips underneath. When the viewer shifts their angle of observation, each lens shows a different portion of the interlaced image. This selective viewing is what creates:
- Image change or flip effects, where you see one image at one angle and another at a different angle.
- Animated sequences, where the image appears to move or transform as you tilt the print.
- 3D illusions, where each eye receives a slightly different view, simulating depth.
How 3D lenticular works
When the lenticular plastic is oriented vertically, each eye sees a slightly different viewpoint of the interlaced image. In 3D lenticular printing, software merges these multiple viewpoints (or uses generated depth maps) into one interlaced file. Each lens then directs the left-eye image to the left eye and the right-eye image to the right eye, creating the perception of depth—without the need for 3D glasses. This principle applies equally to layered 3D (simple separation of layers) and more complex volumetric 3D.
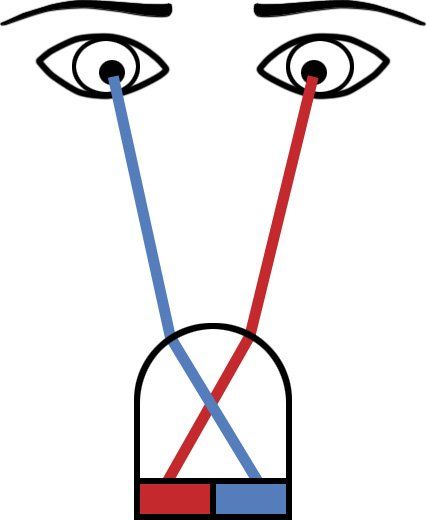
What is binocular disparity
Binocular disparity is the slight difference between the images seen by each eye. Because our eyes are set apart horizontally, each eye captures the world from a unique angle, and the brain merges these two angles into a single 3D perception. Lenticular printing taps into this natural process by providing each eye its own distinct slice of the image. The same underlying mechanism—directing a different strip to each angle—also enables flip, animation, and image-change effects in lenticular prints.

What is needed for lenticular printing
In order to produce professional lenticular images—whether for flip, animation, or 3D effects—three main elements are required:
1. Imagiam’s Lenticular Software
With over 20 years of innovation, Imagiam’s next-gen lenticular printing software covers every stage of 3D lenticular production. Equipped with advanced color management, an intuitive depth-control system, and precise interlacing technology, it helps you create stunning visuals with maximum efficiency. Many equipment manufacturers trust and recommend Imagiam’s software, and we also offer training and consultation to ensure top-tier results.
2. Lenticular Plastics
Choosing the correct lenticular plastic (with the right LPI and viewing angle) is vital for achieving the desired effect—be it large-format 3D or a small flip animation. Imagiam collaborates directly with certified manufacturers to provide high-quality plastics suited to offset, digital, or UV printing. Our experts can advise you on the best plastic type for each project’s size, viewing distance, and visual goals.
3. Printing Equipment
You can print the interlaced image directly onto the plastic using UV offset or digital flatbed technology, or print onto a stable paper/film and then laminate it to the plastic with a transparent double-face adhesive (common for inkjet workflows). Accurate registration is key to aligning each lens over its corresponding image strip—Imagiam’s software ensures seamless calibration and superior lenticular results.
Do you want to buy lenticular software?
Check our price list to find out which edition best suits your needs.